
A whole new bottom
Sometimes you need to start from scratch to get a great finish below the waterline
It took me a while to admit that I had a problem and a little longer to actually deal with it. Denial is a strong emotion but I finally hit rock bottom in the fall of 2012 and accepted that I needed to do a complete bottom job.
I bought L'Aquila, a 1983 Stevens 47, in the summer of 2001. As I surveyed it I noticed that it had a fresh layer of bottom paint over flaking paint that had only been scraped. I figured I would need to sand the bottom the next time it needed paint and apply a coat of new paint over the smoothed bottom. I did this the following year and thought I had solved my problem.
When I hauled the boat the following fall, the pressure washer took off large sections of my new paint. So, I sanded a little deeper the following spring and painted again. I did this dance every spring and fall: Every spring I would paint and every fall the paint would peel off. I finally ended the madness last year and had my boatyard, Manitowoc Marina in Manitowoc, Wisconsin, remove the old paint. I would take the new paint job from there.
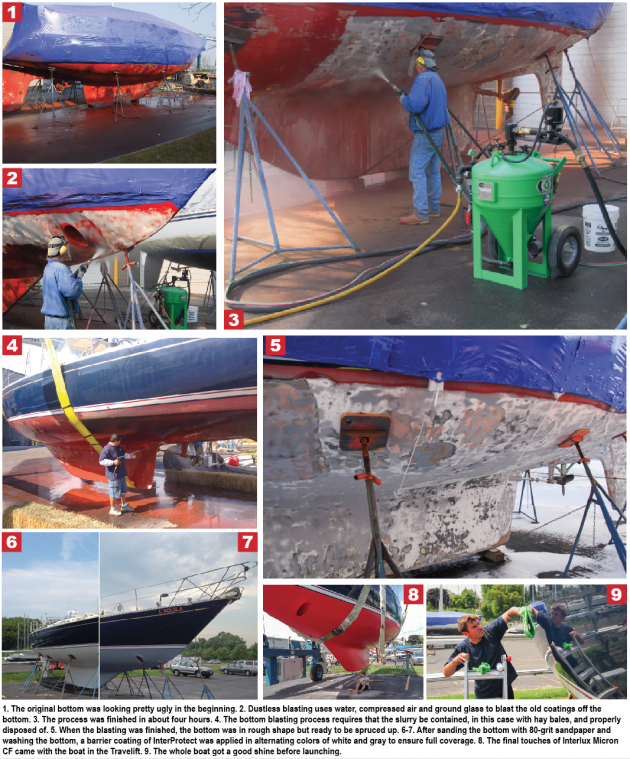
The first thing to consider in a full bottom job is removing the old paint. Your options are sanding, chemical stripper, sand blasting, soda blasting or wet dustless blasting. Sanding is tedious, slow and terribly dusty, and many yards won't even allow this method because of the toxic airborne dust it produces. Chemical strippers work well but they are not perfect. You need a minimum of 60- to 70-degree ambient temperatures, so this rules out a spring or fall job in much of the northern United States. The strippers and the stripped paint are as toxic as the paint dust. Sand blasting is fast, but very dusty, and most yards require that the boat be tented. The sand can be very aggressive to fiberglass and the operator, so the job needs to be done with care. Soda blasting is sand blasting with sodium bicarbonate (baking soda). The baking soda is far less aggressive than sand, but the dust management is still an issue and typically requires full tenting.
I chose to use a process that my yard has just begun using called dustless blasting (www.dustlessblasting.com, 800-727-5707). This is a process where water, compressed air and ground glass are combined and blasted against the fiberglass at high pressure. It is minimally aggressive and the water suppresses almost all the dust. The process was developed in the auto restoration world where dust management is an issue for restorers, and the wet process both controls dust and heat. The process is clean enough that no tenting is required but a system must be devised to capture, collect and properly dispose of the slurry that falls to the ground.
Dustless blasting is relatively fast, and it took a bit over four hours to do my boat. The result is great and left the fiberglass, barrier coat and gelcoat in place, but removed bottom paint and any less-than-sound fairing compound. The process left me with clean fiberglass with a random surface of barrier coat and filler. I learned my boat had not been completely barrier coated, just the areas that have been worked on over the years. The surface came out with a rough orange peel texture. They were able to blast to within roughly 3 inches of the waterline, and the rest would need to be sanded by me.
The yard blasted the boat in November 2012, I let the boat sit over the winter. It was too cold to paint and I figured the cold dry winter would dry out any moisture in the fiberglass.
Over the winter I did a lot of research with industry experts. I learned that I likely had a surface preparation problem and that I was on the right path. The process would be sanding, fairing, barrier coat application and finally paint.
Sanding the hull was the first step. The blasting left the hull clean but not ready to paint. I had to sand to an 80-grit finish. The sander, the pad on the sander and the disks all matter. You want to use a random orbital sander, sometimes called a dual action or DA sander. This sander spins and orbits a tiny bit, giving a random scratch pattern. A 3/16-inch orbit gives a nice coarse scratch. For surfacing, smoothing and fairing you want to use a pretty hard pad so it doesn't conform to the hull. Use good quality disks and change them often. A low quality or worn disk will leave the surface too smooth and the barrier coat may not adhere properly. I chose to use a 3M electrical random orbital sander with a 3/16-inch orbit and vacuum attachment, and 3M P80 Gold Hookit disks.
The sanding took a while, but the result was worth it. I started the process by wiping down the entire bottom with Interlux 202 Solvent Bottom Wash to make sure I had no surface contamination. I put the solvent in a metal sprayer, sprayed it on an area and then wiped it down with a clean shop towel. The sanding effectively removed all of the "high" orange peel and left just the negative part of the orange peel. I was able to sand to within about 1/4 inch of the waterline with the orbital sander and sanded the last bit using a Black and Decker Mouse vibrating sander and trimmed 3M disks. I was able to do all of the waterline in one long, tiring afternoon.
Next, I applied a coat of barrier paint over the sanded bottom. The barrier coat served as a primer, a minor filler and allowed me to clearly see what the bottom looked like. I chose to use Interlux InterProtect 2000E, which is about the consistency of thick latex wall paint so it fills small voids nicely and gives a nice surface to fair over. InterProtect's main function is to provide protection against water absorption into the fiberglass. A 10-millimeter layer-about five coats for my boat-will give full protection. This coating can be sprayed or rolled but I chose to roll mine on with a 3/8-inch nap roller.
Between each coat, I taped the waterline with regular painter's tape and 3M Fine Line flexible tape on the ends of the boat where the waterline curves a lot.
I was able to move the jackstands throughout the process with the permission of the yard. After the first coat of InterProtect was fully cured, I moved the stands, sanded under them and rolled on a coat of InterProtect.
Once the InterProtect dried, I skim coated the hull with filler. Below-the-waterline filler is tricky to work with, in terms of working and sanding time. You effectively have two choices, an epoxy filler, like Interlux InterProtect Watertite, will give roughly 20- to 30-minute working time and must dry overnight before sanding, or vinylester, like 3M Marine Premium Filler, with a five-minute working time and 30-minute dry-to-sand time. I chose to use epoxy for my first skim coat and subsequent fills and vinylester for the final touchups.
When the skim coat dried, I sanded again with 80-grit, blew the dust off with compressed air, followed by a wipe down. I filled a few obvious spots with vinylester filler and resanded those spots.
I was now in a position to start the barrier coat application. Applying barrier coat used to be very tricky in terms of timing, the overcoat windows were very tight; luckily InterProtect allows for a two-week overcoat window. The only critical overcoat window is between the last coat of InterProtect and the first coat of paint, you need to apply the paint when the InterProtect is thumb print tacky-when you can just leave a thumbprint in the barrier coat. On my boat that was a pretty much back-to-back InterProtect and paint job.
Interlux recommends using alternating colors of InterProtect-white and gray-so you can be sure to apply full coats. I started with gray and alternated to finish with gray. I put on three coats of barrier coat over two days. I saved the last one to put on just before the paint.
I struggled with a paint decision. I sail on the Great Lakes and sadly my boat sits for long periods of times, I need good antifouling protection. I considered Interlux VC-17m, because the paint is slippery and offered pretty good antifouling protection, but it only works in freshwater and my boat will likely not always be in freshwater. I settled on Interlux Micron CF, a copper-free low VOC ablative paint.
Interlux recommends three coats of paint on a new paint job, one contrasting color and then two in the chosen bottom color. I chose my base coat in black, and then two coats of red.
As I rolled on the final coat of Interprotect I was ready to start the paint coat. My boat takes about two hours to cover, so the first areas were already dry enough to overcoat. I quickly rolled on the black coat and called it a day. After the paint dried I moved the boat stands for a final time, applied a couple coats of InterProtect and painted the pads with black bottom paint.
On the final day, I rolled on two coats of bright red. I saved a bit of paint to roll under the pads and blocking points on the keel, while the boat was in the slings of the Travelift.
Paint builds up on even the finest of boats and you eventually will need to get back down to "zero."
The process is fairly straightforward and it's a great time to fix the sins of the past and go forward with a protective bottom that will last a long time.
BOTTOM REFINISHING PROJECT
Blasting $3,000
Sanding and fairing materials $500
Interprotect
5 coats (10 gallons) $1,250
Bottom paint
3 coats (8 gallons) $1,800
Total $6,550
Comments