
Working with single-braid Dyneema
Learn to make lashings and grommets with high-tech line
In about a decade, Dyneema (sometimes called Spectra, both are trade names for the same material) has gone from a gee whiz high-tech marvel to common place on many boats. It started out replacing wire rope on race boats, but it appears in one form or another on many cruising boats today.
“With the advent of modern synthetic line, wire rope will be a 15-year anomaly in the history of sailboat rigging,” said master rigger Brion Toss. Toss aimed a little high, and low, here, I think 1x19 rigging wire will be with us for a while, but Dyneema has completely replaced 7x19 and is making a solid dent in the application of screw shackles and other hardware.
Working with Dyneema takes some different skills than other rope. You can’t just tie a bowline in this stuff and call it a day. This slippery material will allow the bowline to slip loose at about 20% of the breaking load of the rope. The key to successfully applying Dyneema is to generate enough friction to overcome the slipperiness. I am going to walk you through the application and construction of two ancient rope tools, the lashing and the grommet. These two techniques were very commonplace back in the square rigger days, and largely forgotten, but very much in vogue today, reinvigorated by Dyneema.
First, let’s take a few steps back to understand what this rope is made of. As I mentioned, Dyneema and Spectra are just trade names for ultra-high molecular weight polyethylene, a plastic material with many uses, due to its strength, abrasion resistance, slipperiness, zero corrosion, and the fact that it floats. Pound for pound it’s stronger than steel, many times more abrasion resistant than steel, as slippery as Teflon, and floats. If it has an Achilles heel, it’s heat; it starts to break down at about 150 degrees Fahrenheit. Excluding some applications in the galley and engine room it’s a winner on the boats we sail. This material was born in a lab in Europe in the 1950s and has been applied in many situations. In solid form it’s used as a high-tech plastic for bearing surfaces, medical joints and is the basis of Starboard HDPE boards as replacement for wood. It can be melted and extruded into fiber like a high-tech spider, and that fiber is the basis of the rope we use.
OK, enough history, let’s get to work on a lashing. A lashing is pretty low tech: you just take many wraps of line between the two things you are attaching and finish with a lot of half hitches. You can think of it as a static multipart purchase, many parts carry the load, so no one part is exposed to much load.
All those wraps and half hitches create a lot of friction to overcome the slipperiness of the Dyneema. Lashings are very handy, they are easily made on-site to the length you need, will articulate to the load and are very durable. You need to monitor them for chafe, but all in all they are a handy tool.
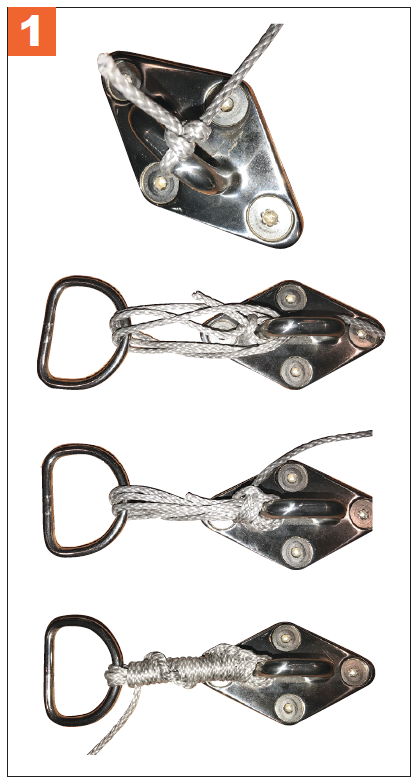
Start by anchoring the lashing line with a buntline hitch (Figure 1). Next, take a number of wraps between the two parts. It’s important to keep the tension and length equal so all the parts take their share of the load. Once you have enough wraps, and that’s generally a function of the size of the lashing line and the parts you are attaching, you will finish with a series of half hitches. For a rule of thumb, I generally lash with cordage between 7/64-inch and ¼-inch and take six to eight wraps. In very short lashings you can cover the entire length of lashing with half hitches, in longer ones six to eight are enough.
Grommets
Digging equally far back into sailing lore, we’ll dig into the grommet. Grommets were traditionally made from three strand. These days you’ll only see three-strand grommets on very traditional vessels or used in rope dog toys, but the Dyneema grommet is a rock star. Race boats use them everywhere to replace shackles and other hardware. You can buy them already made up, but they are easy to make yourself and dramatically cheaper.
Topologically, grommets are pretty simple, they are just a continuous loop of line formed by two back-to-back splices. The bury length of the splices is fairly critical: they need to be long enough to generate sufficient friction. The standard bury is a length equal to 72 diameters of what is being spliced. So in 1/8-inch rope we’d bury 9 inches (.125 multipled by 72). This means we need a grommet circumference of at least 18 inches—double the bury length. This may sound like a huge grommet, but we are only talking about a 5.75-inch diameter. You can cheat the bury lengths a little but be advised that you are weakening the resulting grommet.
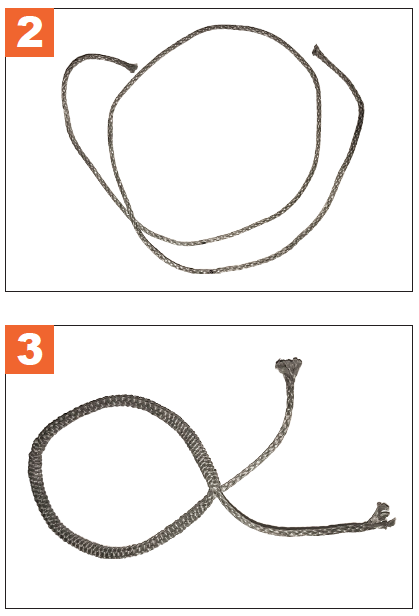
The first step is to setup the rope to form into the grommet. You’ll need a piece a bit longer than the finished circumference, plus the twice the bury length, plus eight times the diameter of the rope. That eight times part is to allow for loss of length in the bury—the rope gets a little fatter and shorter over the bury.
We’ll lay it out like this, marking that black dot with a marker (Figure 2).
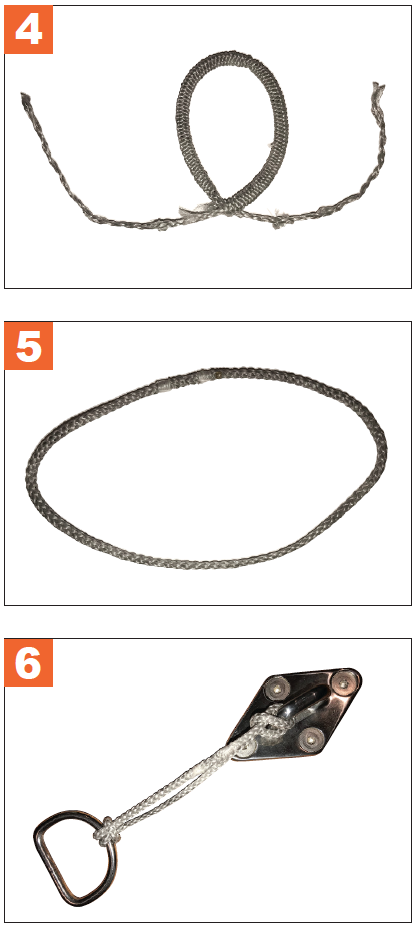
Next, bury each end into the opposite end starting at the black mark (Figure 3).
Finally, taper each end half the length of the bury, just evenly remove half the strands (Figure 4).
Pull the tails to align the black marks and smooth out the buries to retract the tails into the rope.
Before putting any load on the grommet, place a small whipping on each side of the crossover (Figure 5).
Typically a grommet is used with luggage tag hitches. You will luggage tag onto the block or whatever you are attaching, and then luggage tag the whole assembly to a padeye (Figure 6).
I think you’ll find these two techniques are valuable tools to have in your marlinspike toolbox, just be sure to practice with them before you put them to use.
Comments