
Cockpit awning on a budget
At less than $100, this DIY awning might not be as pretty as one that’s custom made but it does the job
If your boat lies unattended, even for a short time—be it in a marina, (in or out of the water), or on a mooring—it doesn’t take long for it to become grubby, from bird droppings or wind blown dust. An awning is still the simplest and most effective defense method. It works particularly well to protect a large cockpit or the cockpit of a pocket cruiser for sleeping and living.

I wanted to cover the center cockpit and bimini on my 45-foot schooner Britannia to shield it from the Florida sun. The bimini enclosure leaked a little especially during some of the horrendous cloudbursts on summer afternoons.
Of course, it’s always possible to have an awning custom made at any canvas or sail maker’s loft, but that wasn’t in my budget.
The simplest and easiest way to create an awning is to buy a cheap plastic tarp from your local DIY store, drape it over a boom and attach it to the rails with bungee shock-cord, to basically form a simple tent or lean-to. The main boom on Britannia passes straight over the cockpit, so making a tent was easy. Most tarps have eyelets every 18 inches, so threading bungee cord through and hooking the other end to the rail was easy.
However, as might be expected, such a simple solution has its inadequacies. Only the area where there is a support boom can be covered and if you anchor the sides down to a rail it can become a bit of a scramble to edge along the side decks. The tarp will also probably rub against the sides of the bimini, which can cause chafe to both materials in high winds. And, no surprise, a tarp tent looks cheap, because it is.
I thought about how to overcome these defects, and make an awning that is both more effective and looks a bit more professional. An idea sprung from seeing covered wagons in an old Wild West movie and I decided to try to make a curved cover like those wagons. Such an arrangement might also hold the tarp clear of the bimini and allow air to pass between. It should also offer more headroom along the side decks and overcome the access problem.
I found manufacturers offering just such an awning for about $700 for my boat. And although I knew that what I could make would not look as finished as a purchased custom awning, I was mindful of the budget.
I bought a 12-foot-by-16-foot tarp from my local hardware store that nicely fit my main boom length of 16 feet and the boat’s 13-foot beam, tapering down to 10 feet towards the stern. The awning also extended over the aft hatch. Tarps are available in many different sizes and colors, so it should not be difficult to find or tailor one to suit almost any boat.
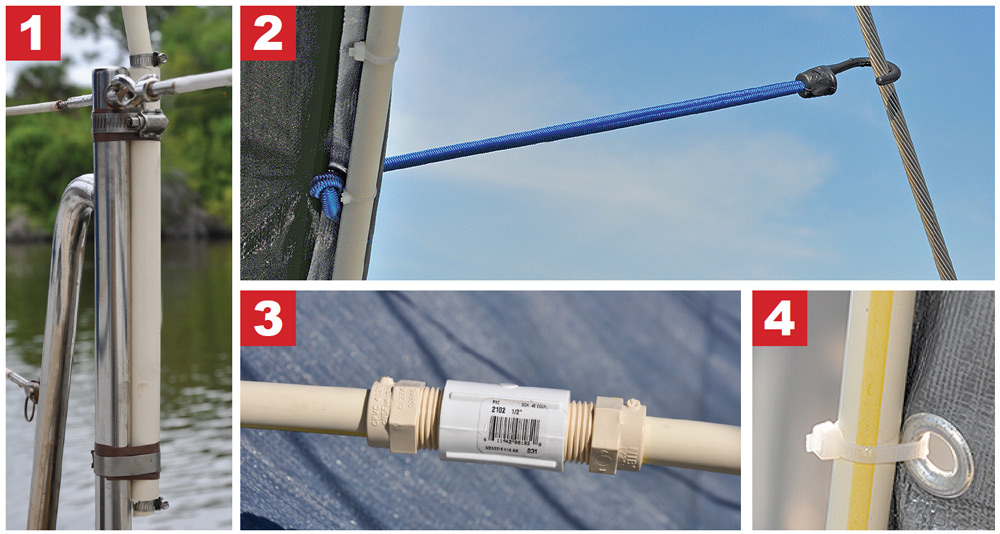
I needed something to make three curved support bars. I bought six 10-foot-long, half-inch diameter PVC pipes. These are very strong yet flexible and used for high pressure hot and cold water in houses. I also found couplings to screw two pipes together so they could also be unscrewed to more easily stow the awning when we went sailing. I glued the adapters to each pipe, then screwed them together with a threaded coupling. 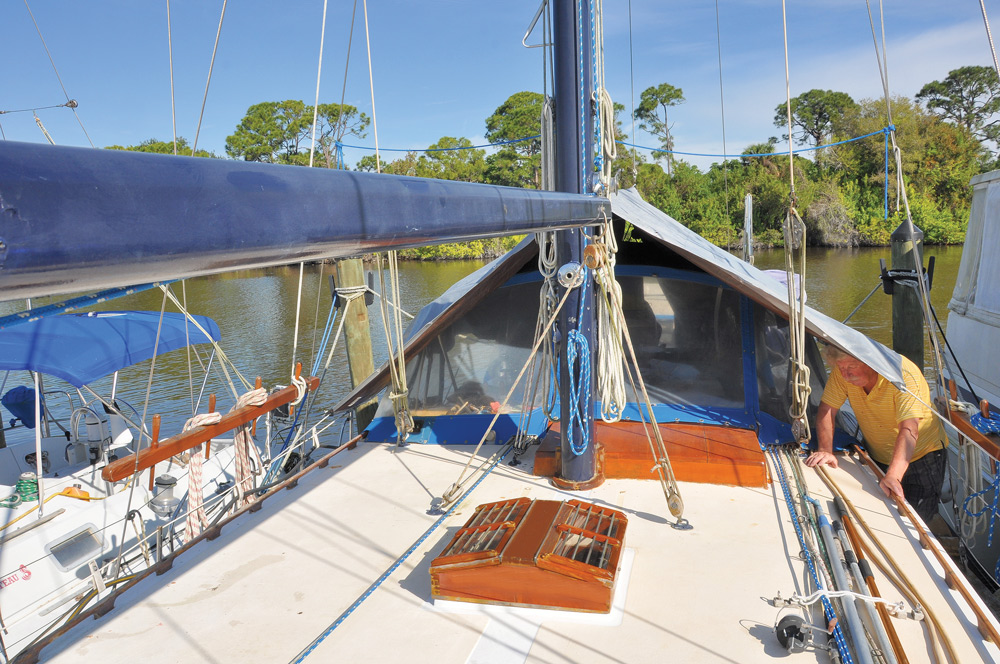
To attach them to the boat I used the same type of pipe, but three-quarter-inch diameter. This size pipe has an internal diameter of a half-inch, so my half-inch awning supports slid inside this pipe perfectly. I fastened three short lengths of three-quarter-inch pipe to the stanchions on each side of the boat using hose clips, after first taping the stanchions to prevent scratching by the clips. The awning rods easily curved over the boom and into these sockets, forming three perfect arches. I fastened half-inch hose clips on the rods, to prevent them from sliding through the sockets.
After dragging the tarp over the boom, I used cable ties to strap it securely to the rods, through the eyelets in the front and back of the tarp. I then used one-quarter-inch line to secure the awning round the mast and a cable tie at the rear to fasten it to the end of the boom. I could only fasten the center support rod at the edges of the tarp, but it has stayed in place so far in all winds.
I then bought 10 3-foot lengths of bungee shock cord, (blue color to match the rest of the boat), with pre-made hooks on each end to anchor the tarp to the side lifelines and the front and rear rods. All that was needed to attach the cord to the tarp was to cut the hook off one end, then thread it through an eyelet in the tarp and tie a single overhand knot to stop it slipping out. The central arch not only supported the middle of the long tarp, but it provided more room to get under the awning and made it look neater. Shorter awnings than Britannia’s might not need a center support.
All told, the materials for this project cost just $90, including $37 for the tarp.
Dismantling the awning when we wanted to go sailing actually proved to be quite simple, and my wife and I soon became proficient. Leaving the two center fastenings front and back still attached, the shock cord is unclipped and the rods removed from their sockets. The rods are then unscrewed and one side of the awning is folded over the other while still attached to the boom at both ends. Then we remove either the front or rear center attachment and the awning can be tightly rolled up along with the rods. I tie the rolled up tarp to the lower lifelines on my boat, where it is out of the way, again using bungee cord.
This inexpensive awning effectively protects Britannia’s canvas bimini from the fierce Florida sun as well as any expensive custom made cover. Temperatures in the cockpit are also significantly lower than when the awning is not fitted, and I can comfortably get along the side decks.
I consider this to be ample reward for the financial outlay and the small effort. I can even put up with the occasional remark that it “looks like a replica of a Conestoga wagon,” because envy is just another form of flattery.
Comments