
Splicing high-tech line
Strong, tough single-braid can replace wire with the right splicing method
I am going to make the bold statement that there is no reason to use wire rope in our running rigging any longer. Single-braid, high-tech lines have displaced the need for 7x19 wire and Nicopresses. I am not quite at a point say we don't need wire standing rigging, steering cables and the like but their day is coming, too. Fiber materials are far lighter, stronger pound for pound, less expensive, more flexible, smoother running and corrosion proof. Fiber is easy to terminate too, and something you can do yourself. This all combines to give us a better "tool" to use on our boats.
Using 7x19 wire in backstay adjusters, boom vang cascades, halyards and many other places used to be the norm. We also all remember dirty wire, meat hooks and bulky Nicopress fittings. These can all be replaced with 12-strand high-tech line made from Spectra, Dyneema and Vectran. Examples of this line are Samson Amsteel Blue (www.samsonrope.com) and New England Ropes Endura 12 (www.neropes.com). Even something as simple as lazy jacks can be better implemented in very small Spectra. The rope is very slippery so the sail slides down easily and so small that it has very little windage.
A single-braid rope is braided up with typically 12 strands of fiber, and this 12-strand braid forms a tube. If you look closely at the braid, you will see that six strands rotate to the left, and six strands rotate to the right around the rope. To splice single-braid, you simply tuck the end of the rope down the center of the fiber tube. The splice works on the same principle as the Chinese handcuff trick, the tighter the rope is pulled, the more the tube constricts. This constriction combined with friction makes for a near 100% efficient splice. Since the material is very slippery and even low percentage loads are quite high, we do a little locking arrangement before we do the bury. This lock, called a Brummel, holds the splice together under low load, until the larger loads come on to provide strength via compression on the bury.
Splicing is a great foundational skill. A simple eye splice will let you replace the equivalent of a Nicopressed eye, but with just a bit more related skill you can make a host of other cordage tools. Even the very fashionable and expensive Spectra softies will be within reach. Please don't be tempted to use this rope and then use knots to terminate it. The material is far too slippery, a knot will fail at 50% or less of tensile strength. If a knot holds in your application it likely means that the rope was too strong to begin with.
You will need a few tools to splice; a marker, tape measure, scissors, some type of tucking tool and a small awl. The tucking tool can be a traditional tubular fid in a diameter to match the rope, but I vastly prefer the Splicing Wand created by Brion Toss Yacht Riggers (www.briontoss.com). To make the instructions general purpose and easy to remember the dimensions are all relative to rope diameter. For instance if we do a 72-diameter bury in 1/8-inch rope this is 72 times 1/8 inches or 9 inches. I have included a table for common rope diameters, but the intent is that the lengths can be calculated as needed.
With just a little bit of work and a few tools, you'll be a proficient single braid splicer. With this skill you can easily replace all the 7x19 wire on your boat. You'll get better performance and save weight and money in the process.
Start by putting a mark 72 diameters from the end of the tail that you will bury. Next, layout the eye size and mark the rope at the other side of the eye. Lining up these two marks will roughly give the eye diameter. Figure 1 shows the layout.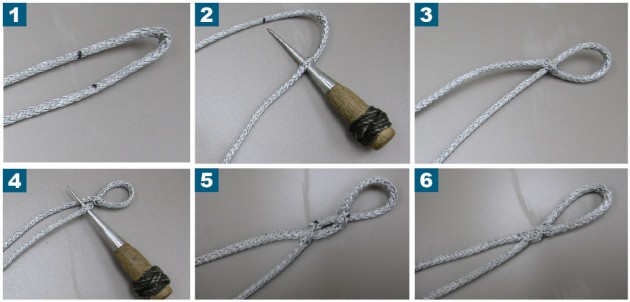
Using the awl, separate the strands at second mark as equally as possible, effectively making a hole in the rope. Figure 2 shows the awl in place. Push the end of the tail through this hole and form your eye by lining up the two marks. Figure 3 shows the first tuck.
Next, form a hole in the tail a few diameters toward the end from the first mark. Figure 4 shows the position of the awl. Push the opposite end of the rope through this hole. Pull the whole length of the rope through until the Brummel draws together. Figure 5 shows the Brummel that forms. Pull on the eye and draw the Brummel up tight. Figure 6 shows the brummel after drawing it tight. You'll notice this splice requires access to both ends of the rope.
You need to taper the tail you are going to bury. This taper will make the tail easier to bury and will ensure that the splice tapers nicely into the rope. A harsh lump at the end of the splice will cause a weakness in the finished splice. Starting about three-quarters of the tail length from the end, pull out six evenly spaced whole strands (three left laid and three right laid) at regular intervals, finishing about 18 diameters (or a quarter of the tail length) from the end of the rope. You can cut off each strand as it is pulled out since high tech rope is laid tight enough not to unravel. You will find the strands hard to cut, the high tech fibers are really strong. Figure 7 shows the tapered tail.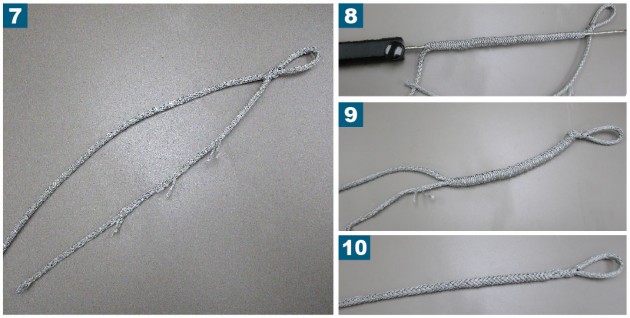
Now tuck the tail into the rope. Using your tucking tool, enter the tail at the mark you made in the beginning and exit about 1.5 tail lengths down the rope. The tail should be long enough to pull out at the exit point, the standing part will bunch up to allow this. Figure 8 shows the splicing wand in place. Figure 9 shows the tucked tail, note the bunched up standing part.
We need to taper the very end of the tail to make for a smooth transition. Unravel the tail and with your scissors cut it off at a sharp angle, removing about half of its bulk.
Pull the tail out the exit and bunch the standing part up against the brummel. Next smooth out the bunched up rope until the tail withdraws inside. Figure 10 shows the completed splice. You can also finish with a whipping just below the Brummel.
Comments